
Calibration
Teslasuit devices are packed with integrated systems and sensors — motion, haptic, and biometry, depending on the model. Calibration ensures the measurements are accurate and that the magnitudes applied (especially the electrical impulses used for haptics) are adjusted to your specific body, setup, and conditions. Control Center provides multiple calibration instruments, from fine power tuning of voltage for every single electrode to recording learning samples.
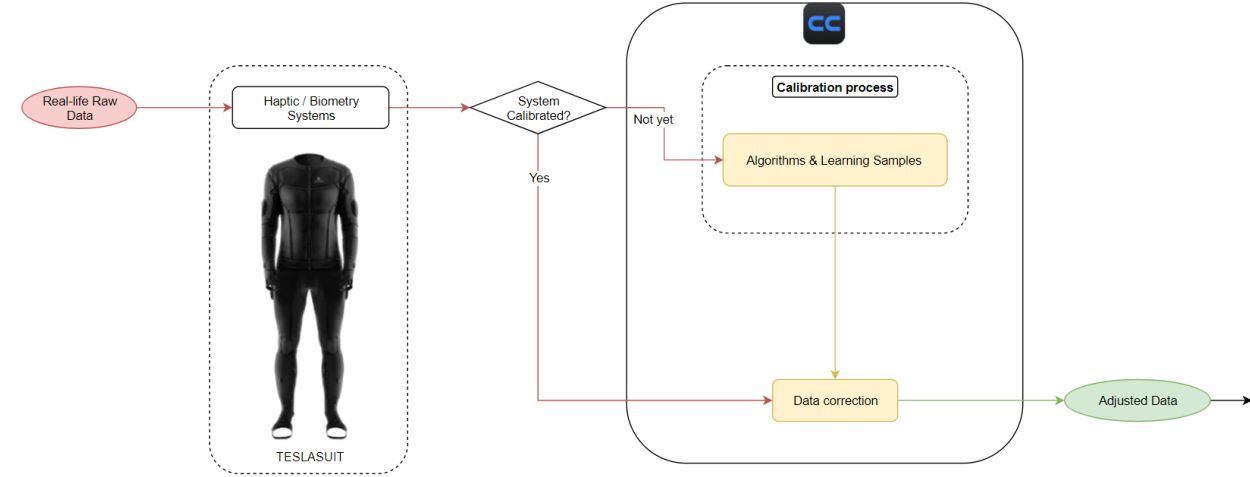
Conceptually, raw uncalibrated data captured by a device's sensors is transferred to Control Center, where it is adjusted using predefined algorithms and learning samples (data-correction procedures developed by Teslasuit researchers). The adjusted dataset is then prepared and handed off for further processing in Studio or other systems. See the concept page Concept - Calibration for the underlying ideas.
Warning
Haptics apply electricity through the skin. Always set thresholds to comfortable levels — never calibrate to the point of pain or discomfort. Check electrode and sensor fitting before you begin, and follow all hardware guidance in Hardware - Safety and Hardware - Wearing.
TESLASUIT calibration#
TESLASUIT includes several systems and sensors: Haptic, Motion (mocap), and Biometry (PPG) — the PPG sensor is present starting from device version 4.5.6. Control Center calibrates the Haptic and Biometry systems directly. TESLASUIT mocap calibration is performed only in Studio, because it often requires readjustments in the initial dataset.
Haptic#
Haptic technology emulates the properties of real-life objects by applying electric impulses through the skin. Haptic calibration adjusts the intensity of those impulses for a specific body part or area, based on your individual sensations. The default minimum and maximum power values are preset at 1 % and 30 %, but performing an initial calibration is strongly recommended — it adjusts sensations to your body and helps avoid discomfort or pain.
To open haptic calibration:
- Launch Control Center and authorize with your account.
- Pair and connect TESLASUIT (see Control Center - Pairing & Connection).
- An uncalibrated haptic system shows an orange circle marker on the device card in MY DEVICES. Press the haptic calibration button next to it to open the CALIBRATION window.
In the CALIBRATION window, the uncalibrated state is shown by the tab indicator and by the Description column of the HAPTIC CALIBRATION REPORT table. The HAPTIC CALIBRATION section offers two types: Semi-auto and Edit (manual).
Semi-auto calibration#
Semi-auto is the recommended type — it is mostly automated and therefore fast, and you can always refine specific values afterward in edit mode. It calibrates TESLASUIT by large zones called areas, advancing sequentially from one to the next, first setting the minimum and then the maximum power. The process is driven by the on-screen buttons or by hotkeys.
The typical procedure for a single area:
- Press the start button or the Space bar.
- The MIN value rises from the default 1 % by 1 % at a time until you press the button (or Space) again. Stop the MIN calibration when you just barely begin to feel the sensation in that area.
- The process pauses, and MAX is set to MIN + 1 %.
- Press the button or Space again to continue calibrating MAX.
- The MAX value rises by 1 % at a time until you press the button (or Space) again. Stop the MAX calibration when the sensation is still comfortable but at about your personal threshold.
The currently selected area is shown graphically and in text, and the MIN / MAX values are displayed both as absolute numbers and on a linear bar. Once an area is done, advance to the next area with the next button or the Enter key. An undo button reverts the entire calibration process.
Edit (manual) calibration#
Edit calibration manually adjusts the haptic power magnitudes. It is significantly slower than semi-auto, but gives more control and precision. You first choose a detalization level:
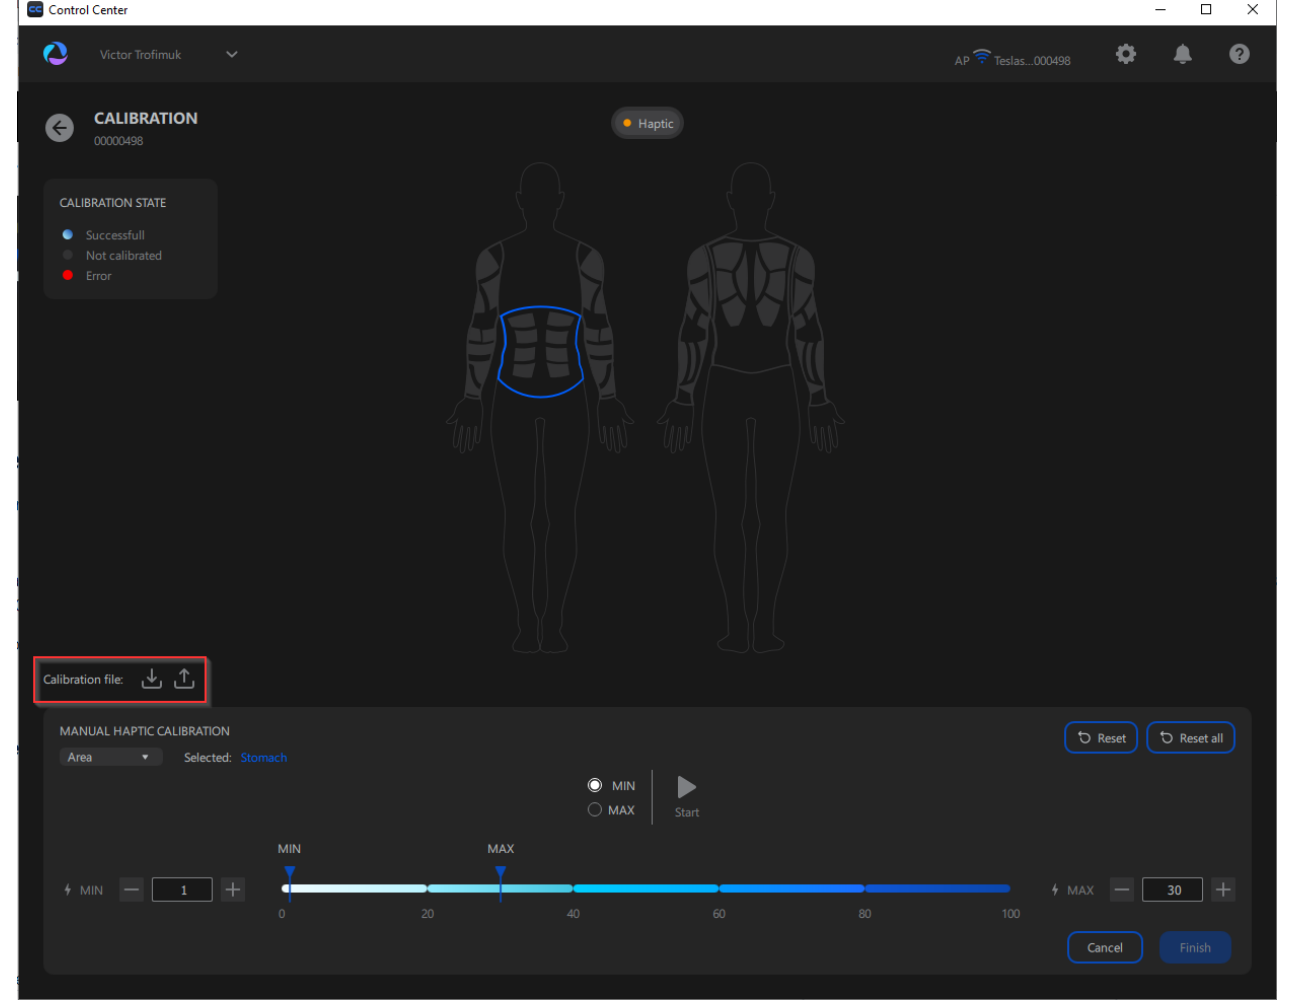
- Area — the largest level; faster, larger-scale calibration. Example: Stomach.
- Part — a medium level; precise yet reasonably fast. Example: Stomach / Right Side.
- Channel — the most detailed level; slower, but allows finely tuned results. Example: Stomach / Right Side / Channel 1.
(See Concept - Haptics for what a channel is and the underlying technology.)
Select the body zone by clicking the visual mapping scheme; the selection is also shown in the Selected text section. Set MIN and MAX via the inputs or by moving sliders along the linear bar, and test either value with the replay control. Use the same guidance as semi-auto: MIN is where you just barely feel the effect; MAX is a considerable impact near your comfort threshold. You can reset a single selected zone to default, or revert the entire calibration and reset all zones.
Import / export calibration setup file#
Both operations live in the Calibration file section of the CALIBRATION window. After completing a calibration, Export saves the result to a file so you do not have to repeat the process — useful when you connect the same TESLASUIT to another PC or use another account. Import applies a previously saved setup. The haptic calibration file uses the extension .ts_haptic_calibration.
Performing this initial haptic calibration ensures comfortable, acceptable sensation levels while using TESLASUIT.
Mocap#
TESLASUIT motion-capture (mocap) calibration is not performed in Control Center. It is done only in Studio, because it often requires readjustments in the initial dataset. See Concept - Mocap for background.
Biometry (PPG)#
PPG (photoplethysmography) in TESLASUIT measures pulse (heart rate) and heart-rate-dependent magnitudes such as heart rate variability (HRV), low-frequency to high-frequency (LF/HF) ratio, and mean inter-beat interval. All TESLASUIT models from version 4.5.6 carry a PPG sensor, located on the outer right shoulder, where the deltoid ends, in the upper-right sleeve of the jacket (the placement is constant across versions). Control Center ships with a preloaded default data sample, but a manual calibration personalizes the results to your individual biometrics. See Concept - PPG.
PPG measurements are extremely sensitive to how well the sensor adheres to the skin, so recalibration is strongly recommended each time you put on TESLASUIT.
To calibrate PPG:
- Launch Control Center, authorize, then pair and connect TESLASUIT.
- Put on TESLASUIT carefully for good sensor contact: start with the right sleeve, slide the right arm in (palm up) until about the middle of the shoulder, then continue putting on the jacket with a twisting movement. The sensor's optimal final position is the outer surface of the right shoulder, where the deltoid muscle ends.
- With the device connected, find the Biometry button in the calibration section of the device card. An orange circle marker means calibration is required.
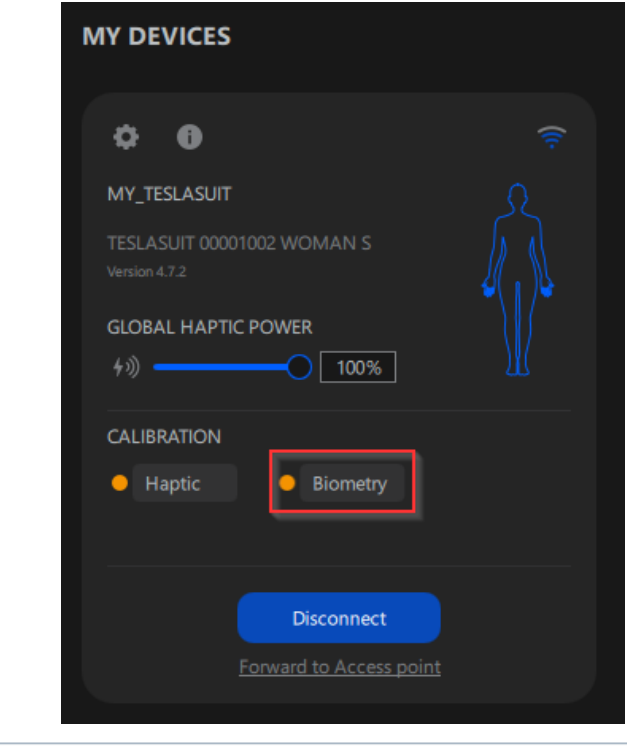 4. Press Biometry. The calibration window opens; the PPG sensor is shown uncalibrated (gray circle). Press Calibration to proceed.
5. Read the Attention warning message carefully and follow its recommendations.
6. Execute the calibration: take a comfortable position and ensure the sensor adheres closely to the skin, press Start (a 3-second countdown begins and sample recording starts), and do not move for a few seconds until the process completes.
4. Press Biometry. The calibration window opens; the PPG sensor is shown uncalibrated (gray circle). Press Calibration to proceed.
5. Read the Attention warning message carefully and follow its recommendations.
6. Execute the calibration: take a comfortable position and ensure the sensor adheres closely to the skin, press Start (a 3-second countdown begins and sample recording starts), and do not move for a few seconds until the process completes.
A successful PPG calibration adjusts all further biometric measurements to your recorded individual learning sample, making the magnitudes more accurate.
TESLAGLOVE calibration#
TESLAGLOVE includes the same three systems: Haptic, Motion (mocap), and Biometry (PPG).
Haptic#
Haptic calibration for TESLAGLOVE adjusts the intensity of electric impulses delivered through the skin of the finger pads (TENS), based on your individual sensations. As with TESLASUIT, the defaults are 1 % MIN and 30 % MAX, and an initial calibration is strongly recommended.
To open it: launch and authorize, pair and connect TESLAGLOVE, then press the haptic calibration button next to the orange circle marker on the device card. The CALIBRATION window again offers Semi-auto and Edit (manual).
- Semi-auto calibrates the glove finger by finger, advancing sequentially and setting MIN then MAX with the same Space-bar / button flow and the same MIN/MAX guidance described for TESLASUIT. The selected finger is shown graphically and in text; advance with the next button or Enter, and undo with the cancel button.
- Edit (manual) adjusts magnitudes for every electric channel — each finger contains 9 of them. The detalization levels are:
- Fingers — a large level; faster, larger-scale calibration. Example: Forefinger.
- Channel — the most detailed level; slower, but finely tuned. Example: Thumb / Channel 5. Select the zone on the mapping scheme, set MIN / MAX via inputs or sliders, test with replay, and reset a single zone or the entire calibration as needed.
- Import / export works the same as for TESLASUIT, using the
.ts_haptic_calibrationfile extension.
Mocap#
The TESLAGLOVE motion-capture system determines the position of the hand and fingers in space, and it is what forms the hand's avatar. It has two subsystems:
- Hand motion capturing — an integrated motion sensor that tracks the movement and spatial position of the hand.
- Fingers motion capturing — integrated magnetic encoders (two per finger) that track flexion/extension and adduction/abduction.
It is recommended to perform the initial mocap calibration in Control Center, and to recalibrate the sensors in Studio whenever you are unsatisfied with the avatar representation.
To calibrate glove mocap:
- Launch and authorize, then pair and connect TESLAGLOVE.
- Put on TESLAGLOVE. With it connected, find the Mocap button in the CALIBRATION section of the device card (an orange circle marker means calibration is required).
- Press Mocap. The calibration window opens, showing the palm and finger sensors as not yet calibrated (tab indicator and the Description column of the MOCAP CALIBRATION REPORT table). Press Calibration to advance.
- A preliminary INSTRUCTION screen appears: keep your fingers together in the same plane during calibration — the easiest way is to lay the hand palm-down on a flat surface such as a table. When ready, click Start recording.
- A 3-second timer records the state; on success you get a confirmation message.
Correct spatial position of the palm and fingers is crucial to creating and representing the hand avatar, which is why the initial calibration in Control Center (and recalibration in Studio if needed) matters.
Biometry (PPG)#
The right TESLAGLOVE carries a PPG sensor on the thumb, used to measure pulse and heart-rate-dependent magnitudes such as HRV. As with TESLASUIT, manual calibration personalizes the results.
To calibrate:
- Launch and authorize, then pair and connect TESLAGLOVE.
- Put on TESLAGLOVE, making sure the PPG sensor fits tightly to the thumb fingertip (measurements are highly sensitive to skin adherence).
- With it connected, find the Biometry button in the CALIBRATION section of the device card.
- Press Biometry; the window opens with the PPG sensor uncalibrated (gray circle). Press Calibration to proceed.
- Read the Attention warning and follow its recommendations.
- Take a comfortable position, ensure close skin contact, press Start (3-second countdown, then sample recording), and do not move until the process completes.
Known limitation
Per the legacy archive, 6-axis mocap calibration is not saved between sessions — recalibrate each time. See Control Center - Known Limitations.