
Electrical Stimulation module
The Electrical Stimulation module (ES Editor) is the functional area for creating, managing, and testing electric (haptic) effects on Teslasuit devices. The general idea is to reproduce real-life sensations with electric signals of predefined parameters. Electrical stimulation is useful across many scenarios — from industrial training and medical research to gaming and entertainment. Concepts: Concept - Haptics.
Warning
Before playing back any haptic content, complete the haptic calibration of your device in Control Center - Calibration. Calibration ensures comfortable, painless sensation levels during playback. Mind comfort thresholds and safety at all times.
Module overview#
Every sensation created in the ES Editor is represented by a preset — a special asset type consisting of touches with predefined parameters. A touch can also carry an effect that defines how the signal parameters change over time. One touch can contain no more than one applied effect.
Each touch has a set of parameters that vary within certain limits:
- Frequency of the electric signal, which defines which muscles are activated. Low frequencies (up to 15 Hz) activate slow muscles, typically engaged when endurance is required; higher frequencies (from about 45 Hz) activate fast muscles, engaged when speed and power are required.
- Pulse width, which controls the depth of signal penetration in the muscle and therefore how many muscle fibres are activated — in other words, how strong the contraction is.
- Intensity, which defines the power of the applied electric signal.
- Duration, which defines how long the touch stays active, in milliseconds.
When you work with haptics, make sure the device is enabled in the Device Manager panel. An enabled device has a blue outline; a disabled device is greyed out. Devices are enabled by default after connection.
Haptic asset types#
Four asset types exist in the Electrical Stimulation module:
- Preset — represents the haptic animation. It consists of touches for one or more channels, with or without applied effects.
- Effect — defines rules for changing a touch's feedback parameters over the touch's duration. Each parameter uses its own Bézier curve, or spline.
- Sequence — defines a series of consecutive touches with particular parameters applied at specific points on a single timeline; a one-dimensional structure with no binding to a concrete channel.
- ForceFeedback — a TESLAGLOVE-specific asset created by converting magnetic-encoder data from a scene capture; played back in the Force Feedback Viewer (see Studio - Data Capturing).
Because different hardware versions place electrodes differently, every preset, effect, and sequence must be associated with its target device version (TESLASUIT or TESLAGLOVE) at creation.
Preset management#
A preset is the main container asset of the ES Editor: a set of touches for one or more channels, with or without effects. Presets are edited in the Preset Editor.
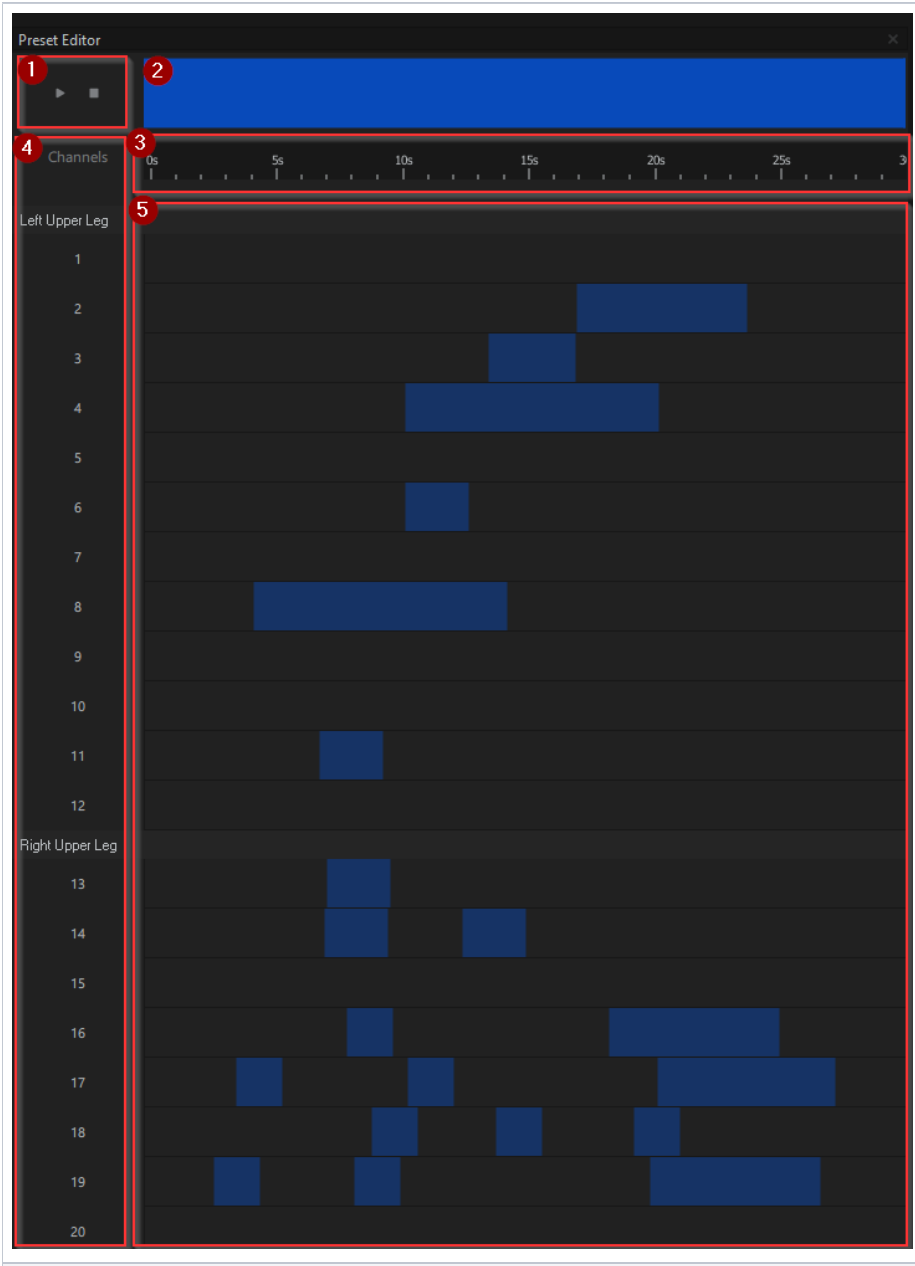
The Preset Editor is organised into five parts:
- Playback controls — the play and stop buttons that start and end preset playback.
- Scaling and navigation bar — sets the scale of the grid and scrolls the playback area.
- Timeline — the time-mark ruler, in seconds, along the top of the grid.
- Channels — the channel numbers down the left side, grouped by body part (for example, Left Upper Leg and Right Upper Leg).
- Touches grid — the working area where touches are placed at the intersection of a channel and a timestamp.
Create a preset#
- Open the unified CREATE ASSET window from Project → New Asset or from the button in the Asset Browser panel.
- Select Preset as the file type. A brief description is shown alongside.
- Set the parameters: Suit or glove (TESLASUIT or TESLAGLOVE), Device version (the electrode configuration/mapping), and a Preset name (or keep the default).
- Click Create.
Double-clicking the new preset opens it in the Preset Editor (showing the name and an empty touches grid) and shows the matching device mapping in the Mapping Viewer. If you modify a preset without saving, an asterisk appears next to its name; attempting to leave an unsaved preset brings up a confirmation dialog.
Import a preset#
A previously saved preset can be loaded into the current project using the import button in the Asset Browser toolbar. In the Windows Explorer window, select the desired file with the .ts_asset extension.
Context-menu actions#
All other preset actions are performed from the right-click context menu:
- Duplicate — creates an exact copy in the Asset Browser, named
Original_name (n)where n is the duplicate number. - Rename — turns the name into an editable field; press Enter to finish.
- Delete — permanent and cannot be undone.
- Save — writes all changes back into the existing file in the project's folder structure on disk.
- Save as — saves the preset to any location on disk via a Windows Explorer dialog. The file keeps the
.ts_assetextension and the same name as in the Asset Browser. - Show location — opens Windows Explorer at the preset's location on disk.
Touch parameters#
A preset is a collection of touches. The available touch parameters depend on the device hardware version:
| Device | Intensity | Pulse width | Frequency | Duration |
|---|---|---|---|---|
| TESLASUIT 4.5.4, 4.5.5, 4.7.2 | not user-manageable | yes, 1–100% | yes, 1–150 Hz | yes, 10–10000 ms |
| TESLASUIT 4.5.6, 4.7.0, 4.8.0, XR5 | yes, 1–100% | yes, 1–100% | yes, 1–150 Hz | yes, 10–10000 ms |
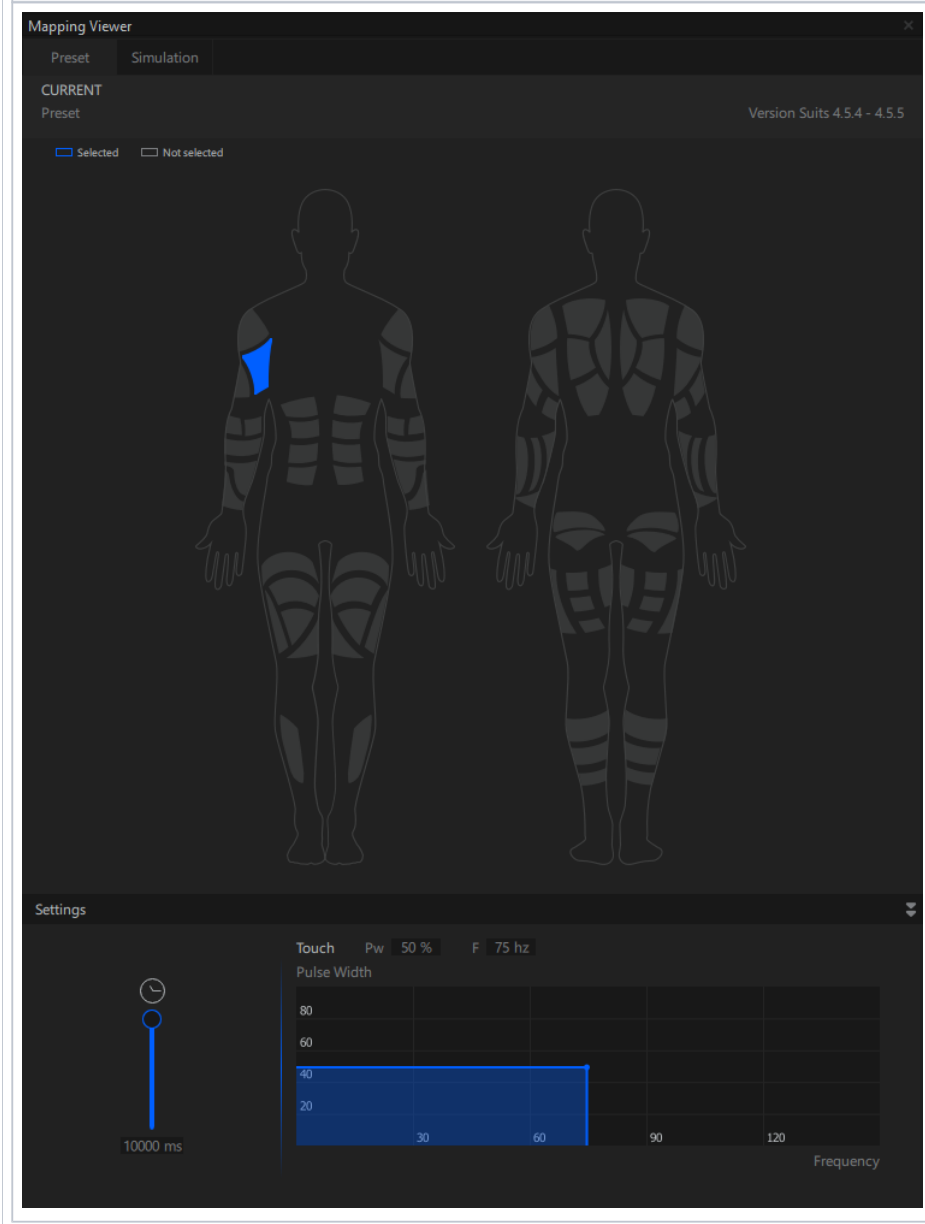
Touch parameters are set in the Settings section of the Preset tab in the Mapping Viewer. The Settings section also shows the preset name, supported device versions, and an interactive plot (a rectangle) representing pulse width and frequency.
Add touches to a preset#
- Set the touch parameters in Mapping Viewer → Preset tab → Settings.
- Place the touch into the touches grid of the Preset Editor by clicking at the intersection of a channel number (y-axis) and a timestamp (x-axis). The start point of the touch is exactly where you click.
Clicking a channel number in the Preset Editor highlights its location on the Mapping Viewer scheme, and vice versa.
Select touches#
- Single touch — left-click it on the grid. The selected touch is highlighted in light blue.
- Multiple touches — hold Ctrl and click each one.
- All touches — select one touch, then press Ctrl + A.
When multiple touches are selected, the Settings section shows the pulse width and frequency of the last-created touch. For intensity, the shared value is shown if all selected touches match; if they differ, a dash is shown.
Change touch parameters#
- Select one or more touches on the grid.
- Modify the values in the Settings section. This works for pulse width, frequency, and intensity.
Duration cannot be changed from the Settings section. Instead, resize the touch directly by click-and-dragging one of the rectangle's edges; hold Ctrl to resize multiple touches at once.
Move touches#
- Select one or more touches.
- Drag them to a new position — along the timeline within a channel, or across to other channels.
You cannot move touches onto a position already occupied. Conflicting intersections are highlighted in orange, and the moved touches are placed in the nearest available location.
Delete touches#
Select one or more touches and press Delete (hold Ctrl for multiple). A single touch can also be deleted by right-clicking it.
Preset playback#
A preset with touches can be played back in Studio. This lets you visually check channel mapping during reproduction and test the haptic effect on a real, connected device.
- Ensure the device is paired and connected via Control Center, and enabled in the Device Manager panel.
- Double-click the preset in the Asset Browser to open it.
- In the Preset Editor, press the play button to start and the stop button to end. Playback also stops automatically when the animation ends.
During playback, the playhead moves across the timeline, and the involved channels are shown on the device mapping scheme in the Mapping Viewer. You can zoom the timeline by hovering over it and scrolling the mouse wheel (or holding Ctrl and scrolling over the touches grid). The navigation slider to the right of the playback buttons scrolls the timeline; its length depends on the zoom level.
Effect management#
An effect is the asset type used to control how a touch's parameters change over time. Within a single touch, a parameter's value is otherwise constant; an effect makes that behaviour variable across the touch's duration. The behaviour of each parameter is described by a spline — a piecewise parametric (Bézier) curve where the X-axis is time and the Y-axis is the parameter's amplitude, both measured in percent.
The variable parameters available depend on the device version: for TESLASUIT 4.5.4/4.5.5/4.7.2 only frequency and pulse width; for all other devices (TESLASUIT 4.5.6/4.7.0/4.8.0 and 5.0.3–5.1.0, and TESLAGLOVE 1.2.0–1.3.0) frequency, intensity, and pulse width.
Basic workflow#
- Create an effect.
- Edit its parameters (splines).
- Apply it to a touch.
Create an effect#
Open the CREATE ASSET window (via Project → New Asset or the Asset Browser button), select Effect, set Suit or glove, Device version, and an Effect name, then click Create. Effects can also be imported from .ts_asset files via the Asset Browser toolbar.
Edit an effect#
Double-clicking an effect opens the Effect Editor, which has three areas:
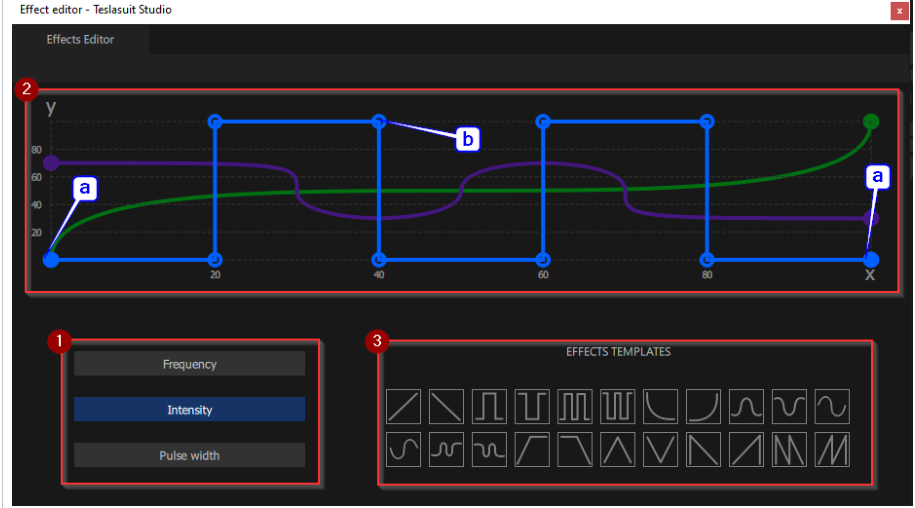
- Touch parameter selection — pick the parameter to edit: Frequency (purple), Intensity (light blue; absent for TESLASUIT 4.5.4/4.5.5/4.7.2), or Pulse width (green).
- Parameter spline — shows the chosen parameter's amplitude over time, which you can modify. Anchor points (a) define the curve; selecting a point reveals the curvature handles (b) on either side.
- Templates library — predefined spline shapes; click a pictogram to apply it.
To modify a spline:
- Add point — right-click the spline and choose Add point.
- Move point — click and drag it.
- Change local curvature — use the circle controls to the left and right of the selected point.
- Delete point — right-click the point and choose Remove point.
Unsaved changes are marked with an asterisk next to the effect name, with a confirmation dialog when leaving.
Apply an effect to a touch#
- Open the preset (double-click it).
- Find the target touch on the touches grid.
- Drag the effect from the Asset Browser and drop it onto the touch.
The effect's version must match the device's version.
Parent and child effects#
There are two kinds of effects:
- Parent effect — created manually in the Asset Browser at the same hierarchy level as a preset. It has no impact on anything until applied to at least one touch.
- Child effect — created automatically as a descendant of the preset when a parent effect is applied to one of its touches. By default it keeps the parent's name.
After creation, the parent and child are entirely independent: changing one does not affect the other. The same child effect can be applied to multiple touches.
Effects support the same context-menu actions as presets (Duplicate, Rename, Delete, Save, Save as, Show location).
Touch simulation#
Presets are ideal for complex sensations, but they require preparation before any playback. When you want to test tactile feedback straight away, use the Simulation tab of the Mapping Viewer. In simulation mode you experience haptic feedback by dragging a brush across selected locations on the mapping scheme:
- Haptic plays immediately as you start dragging the brush.
- Haptic simulation cannot be recorded — it is for testing only.
- You can play on areas, parts, or individual channels of the mapping scheme.
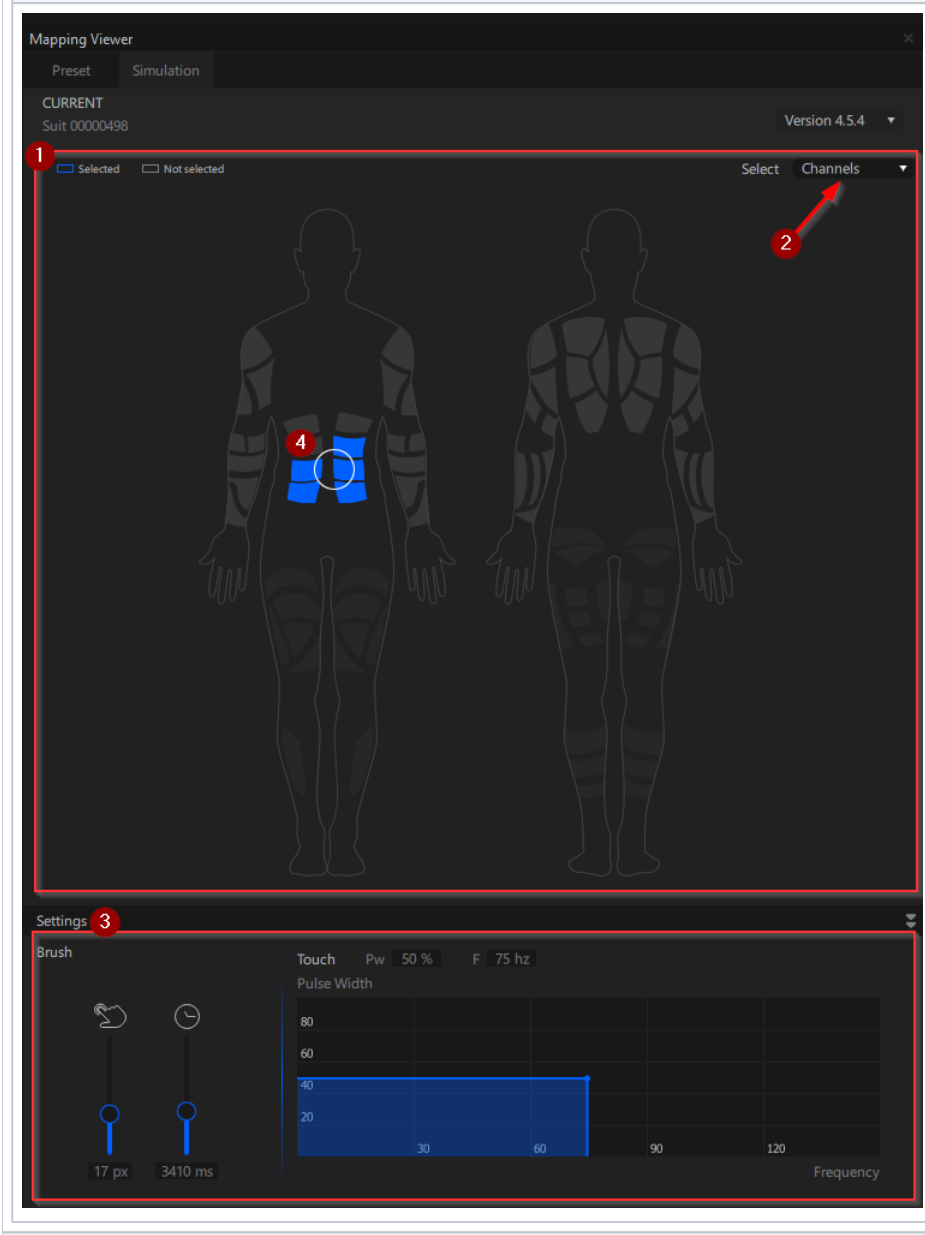
The Simulation tab has four main parts:
- Mapping scheme — the device scheme, showing selected (blue) and not-selected areas.
- Detail-level dropdown (Select) — sets the granularity: Areas, Parts, or Channels for TESLASUIT; Fingers or Channels for TESLAGLOVE.
- Settings — the simulation parameters (brush size, duration, pulse width, frequency, and intensity where supported).
- Brush — the circular brush you drag across the scheme to play haptics in the channels it passes over.
As with playback, the device must be calibrated, paired, connected, and enabled in the Device Manager.
The Simulation tab shows the currently selected device (with a dropdown to switch between multiple connected devices) and the device mapping scheme. A detail-level dropdown sets the granularity:
- TESLASUIT — Areas (largest), Parts (medium), Channels (most precise).
- TESLAGLOVE — Fingers (largest), Channels (smallest).
In the Settings section you adjust the simulation parameters (which depend on the selected device and version):
- Brush size in px — the diameter of the circular brush dragged across the scheme.
- Duration in ms — how long each applied touch lasts.
- Pulse width and frequency — and, for devices that support it, intensity — the magnitudes of the applied touch.
Values are set with sliders or text inputs. Drag the brush across the scheme to play haptics with the chosen parameters in the channels it passes over.
Sequence management#
A sequence is a special haptic asset defining a series of consecutive touches (with particular parameters) at specific points on a timeline. Where a preset arranges touches across many channels, a sequence does practically the same but with no binding to a concrete channel — it is a one-dimensional, time-dependent structure.
A sequence is created in Studio but used outside it: after creation it is saved as a file for use in third-party software. A common use case is triggering specific sensations when designing object collisions in a game engine. Each sequence is tied to a target device version (TESLASUIT 4.5.4/4.5.5/4.7.2, 4.5.6/4.7.0/4.8.0, 5.0.3–5.1.0, or TESLAGLOVE 1.2.0–1.3.0).
Basic workflow#
- Create the sequence.
- Add touches with specific parameters.
- Save the sequence as a file.
Create a sequence#
Open the CREATE ASSET window, select Sequence, set Suit or glove, Device version, and a Sequence name, then click Create. Sequences can also be imported from .ts_asset files via the Asset Browser toolbar.
Add touches to a sequence#
A sequence is created empty. Adding touches is similar to a preset, but for a single, one-dimensional channel:
- Set the touch parameters in Mapping Viewer → Preset tab → Settings.
- Click in the Preset Editor timeline to insert the touch; the start point is exactly where you click.
All touch actions available for presets — add, select, multi-select, move, delete — also apply to sequences in the one-dimensional case. Unsaved changes are marked with an asterisk in the Sequence Editor, with a confirmation dialog when leaving.
Sequences support the same context-menu actions as presets and effects (Duplicate, Rename, Delete, Save, Save as, Show location).