
Interface & projects
This page describes the Studio interface, how projects are organised, and how the two module workspace layouts are arranged. Studio is module-based: you work in either the Electrical Stimulation module (ES Editor) or the Data Capturing module, each with its own set of panels.
Interface overview#
When you launch Studio, the Start window appears. Its appearance differs slightly depending on whether this is the very first launch (no recent projects) or a later launch (recent projects available). From here you open or create a project before continuing into the work area.
Once a project is open, the interface is built around a central work area surrounded by panels. The Menu bar at the top contains the commands for managing projects and opening panels: the Project menu holds commands for creating, opening, and saving projects and for creating new assets, while the Window menu lets you open individual panels and switch between the two module layouts.
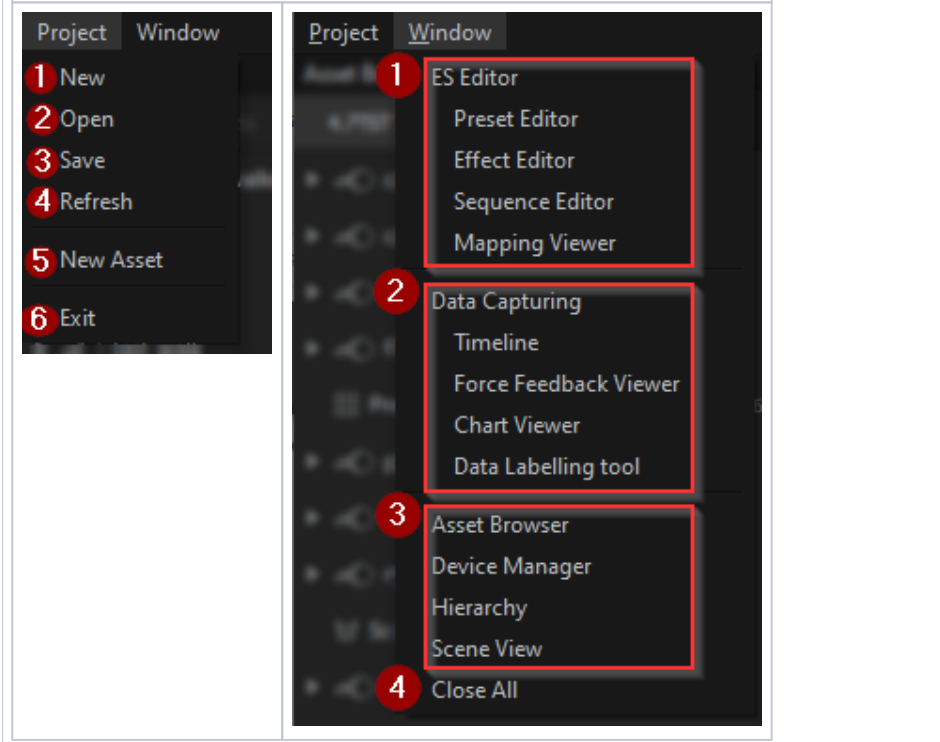
The Project menu:
- New — create a new project.
- Open — open an existing project.
- Save — save the current project.
- Refresh — force synchronisation with the project folder on disk.
- New Asset — open the CREATE ASSET window.
- Exit — close Studio.
The Window menu groups the panels by module:
- ES Editor — the Electrical Stimulation panels (Preset Editor, Effect Editor, Sequence Editor, Mapping Viewer).
- Data Capturing — the Data Capturing panels (Timeline, Force Feedback Viewer, Chart Viewer, Data Labelling tool).
- Common panels — Asset Browser, Device Manager, Hierarchy, Scene View.
- Close All — close all open panels.
Common panels#
Each module has its own dedicated panels, but two panels are common to both the Electrical Stimulation and Data Capturing layouts:
- Asset Browser — displays the structure of all assets belonging to the currently open project. From here you can create, import, duplicate, rename, delete, and save assets, and force synchronisation with the project folder on disk.
- Device Manager — displays the Teslasuit devices currently connected through Control Center and lets you control some haptic parameters directly. You can view device information, search for devices, select the device to use in the Electrical Stimulation module, manage the global haptic power of a device while working with haptics, and view a device's wireless signal strength.
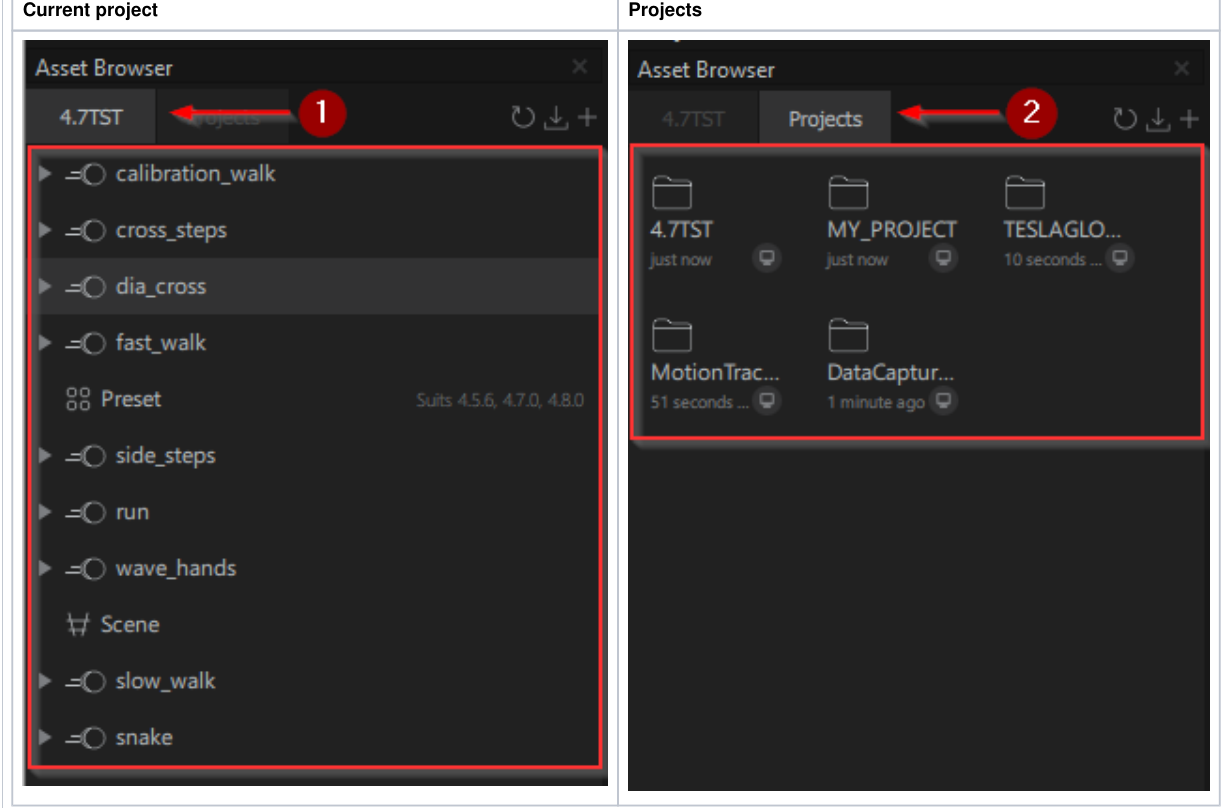
The Asset Browser has two tabs:
- Current project — the asset structure of the project you are working in.
- Projects — the list of available projects on disk.
The CREATE ASSET window is a unified dialog shared by both modules. It is opened either from the Project → New Asset menu item or from the corresponding button in the Asset Browser panel, and is used to create every asset type (preset, effect, sequence, scene, avatar).
Data Capturing panels#
The Data Capturing layout adds the following panels:
- Scene View — a 3D coordinate space (the coordinate grid, or scene) where created avatars appear. Its toolbar is used to calibrate the avatar's mocap system, and within the coordinate grid you manage the camera and observe all of an avatar's movements.
- Hierarchy — displays the structure of an avatar. From here you create and rename avatars, view their structure, and add components to the Timeline or Chart Viewer.
- Timeline — the instrument for recording, playing back, and initially visualising data. It contains a data recording and playback section, a data management section listing avatars and the components added to the timeline, and a charts section showing thumbnail charts for those components.
- Chart Viewer — a panel for detailed chart management and visualisation: scaling, resizing, reordering, and measuring charts.
- Data Labelling Tool — an instrument for manually marking recorded data with markers and areas, which can be exported together with the data.
- Force Feedback Viewer — used to play back TESLAGLOVE force-feedback assets.
Electrical Stimulation panels#
The Electrical Stimulation layout adds the following panels:
- Preset Editor — the panel where you edit presets, primarily through the touches grid. Here you add, move, and remove touches, apply effects, change touch parameters, and play a preset. A scaling and navigation bar manages the scale of the grid and the playback area.
- Mapping Viewer — shows the device's interactive channel mapping scheme, with a Preset tab (touch settings) and a Simulation tab (direct haptic simulation).
- Effect Editor — used to set the rules of an effect by editing its splines. This panel is not open by default; open it from the Window menu.
- Sequence Editor — used to build sequences as a series of consecutive touches on a single timeline.
Project management#
A project is the way Teslasuit organises work with concrete datasets. Creating or opening a project is a required step before performing any other action in Studio — without it, further work is blocked.
A Studio project has a specific asset hierarchy that maps directly onto a folder structure on the local disk. Any change you make to the project structure in the Asset Browser (creating, deleting, or renaming an asset) is reflected on disk, and vice versa. Synchronisation happens automatically, though it can also be forced from the Asset Browser panel. On disk, a project is a specially named directory containing a *.ts_project file.
Open or create a project#
On launch, the Start window offers three ways to continue:
- Open a recent project from the list of suggestions.
- Create a new project with a specified name and in a selected directory.
- Open a project through the standard Windows File Explorer.
If you close the project dialog, you can reopen it with Project → Open in the Menu bar.
Select a workspace layout#
Whether you are creating or opening a project, the next step asks you to select a workspace layout. Studio has two modules to work with:
- Electrical Stimulation module (ES Editor)
- Data Capturing module
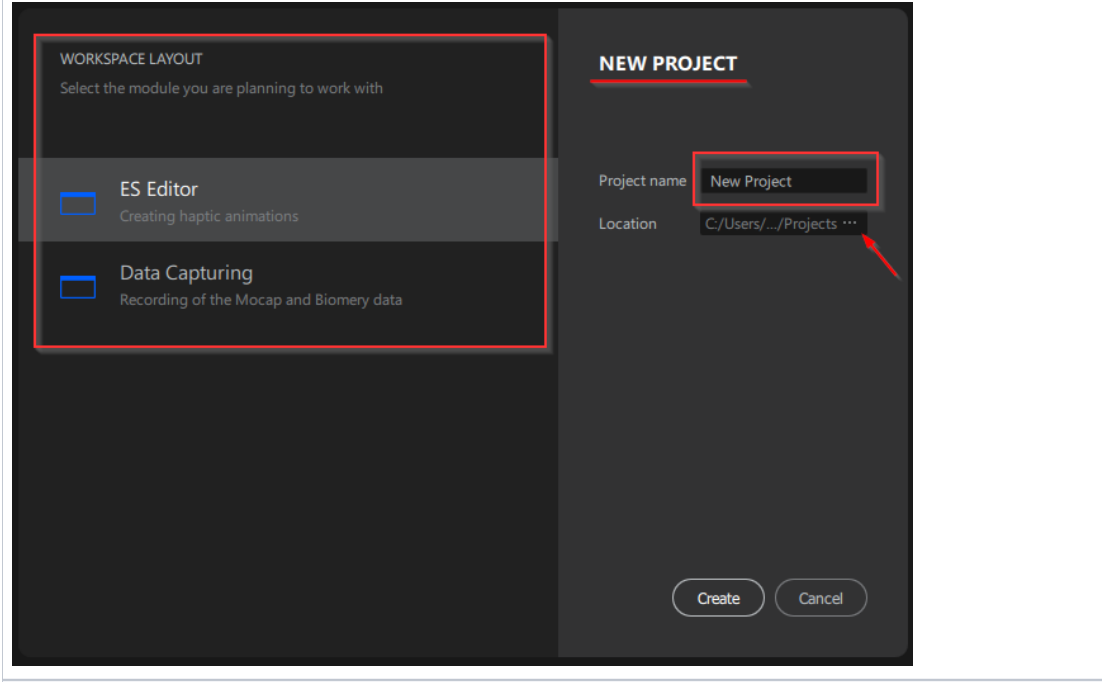
The same project may contain assets from either module, or from both at the same time. Selecting a layout simply arranges the windows and panels conveniently for that kind of work for the moment; it does not restrict what you can do.
Modules & workspace layouts#
Two logical modules are provided for convenient work with specific assets and features:
- Electrical Stimulation (ES Editor) — creating and managing haptic (electric) presets: touch sequences of various parameters, with or without applied effects, based on EMS and TENS technologies. Created and loaded haptic animations and sequences can be played on a compatible Teslasuit device.
- Data Capturing — capturing, recording, saving, and visualising motion and biometric data from the corresponding sensors and systems integrated into Teslasuit devices.
Each module has its own predesigned workspace layout — a set of dedicated windows in a default arrangement. Selecting a module's layout when creating or opening a project does not limit your functional abilities: you can still operate with any asset and open any panel using the menus and controls. The layout is about convenience — a predefined look and feel for the expected use case.
Changing the layout#
You can change the current workspace layout, or add panels from either module to the current layout, from the Window menu. Clicking the first line of a section — ES Editor or Data Capturing — relaunches Studio in that workspace layout. Clicking any item under a category brings up that individual panel in the current layout without closing it.
See the Glossary for definitions of asset, avatar, scene, preset, effect, and sequence. Related concepts: Concept - Haptics · Concept - Mocap.